The Perfect Chocolate Cake Recipe Made Easy
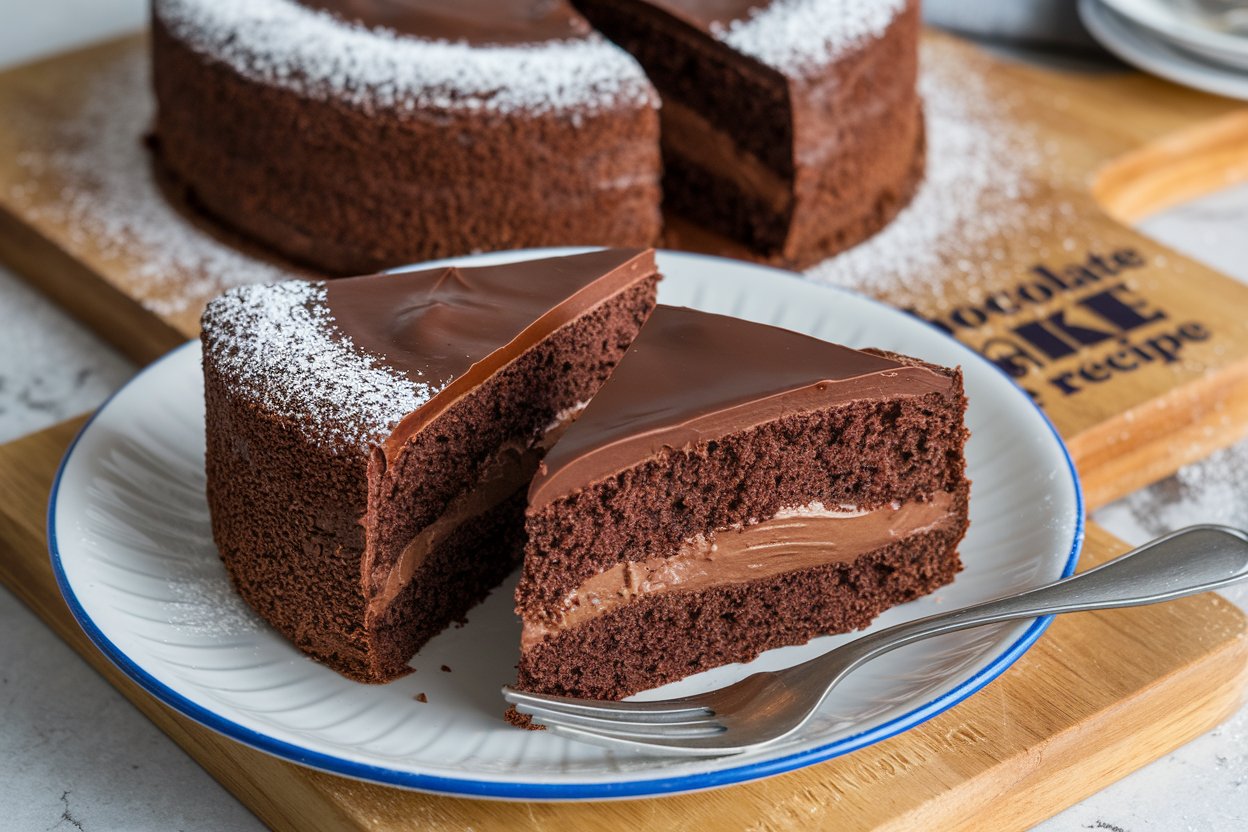
Discover the secrets to baking the perfect chocolate cake! From rich ingredients to pro decorating tips, this guide makes creating a moist, decadent dessert simple and fun. Perfect for beginners and cake lovers alike!
Who doesn’t love a big slice of chocolate cake? The rich, fudgy layers, the smooth, creamy frosting—it’s like a hug for your taste buds! Have you ever wondered how to make one that’s just as good (or better) than your favorite bakery? Guess what? You can!
Whether you’re a first-time baker or someone who’s been whipping up treats for years, this guide will show you how to create a chocolate cake so moist, so chocolatey, and so perfectly fluffy, it’ll have everyone begging for seconds. Along the way, I’ll share my favorite tips, tricks, and even a few decorating secrets to make your cake look as amazing as it tastes.
Ready to dive into the world of chocolatey goodness? Let’s get baking!
Ingredients and Preparation
Making the perfect chocolate cake starts with the right ingredients and tools. Think of this step as building the foundation for something magical. Don’t worry—you don’t need fancy gadgets or rare ingredients. Let’s get everything ready!
Essential Ingredients for a Perfect Chocolate Cake
Here’s what you’ll need to create that rich, chocolatey goodness:
- Flour: The base of your cake. All-purpose flour works best!
- Sugar: Adds sweetness and moisture.
- Cocoa Powder: This is where the chocolate flavor shines—choose unsweetened for the best results.
- Eggs: They help your cake rise and stay fluffy.
- Butter or Oil: Keeps the cake moist and flavorful.
- Milk or Buttermilk: Adds richness and a tender texture.
- Baking Powder and Baking Soda: These are your magic helpers for that perfect rise.
- Vanilla Extract: A little goes a long way for depth of flavor.
If you’re feeling adventurous, you can add extras like espresso powder for a deeper chocolate taste or a pinch of salt to balance the sweetness.
Choosing the Right Chocolate for Rich Flavor
Not all chocolate is created equal! For the best results:
- Dark Chocolate: Ideal for a rich, intense flavor.
- Milk Chocolate: Adds sweetness and a creamy texture.
- Unsweetened Baking Chocolate: A great option for a more classic taste.
Tip: Always choose high-quality chocolate with at least 70% cocoa for the best results.
Tools and Equipment You’ll Need in Your Kitchen
Before we get started, make sure you have these basics on hand:
- Mixing Bowls: One for wet ingredients, one for dry.
- Whisk or Hand Mixer: For combining everything smoothly.
- Measuring Cups and Spoons: Precision is key!
- Cake Pans: Round pans are traditional, but feel free to experiment with shapes.
- Parchment Paper: Helps prevent sticking.
Step-by-Step Baking Instructions
Now that we have all our ingredients and tools ready, it’s time to bring this chocolate cake to life! Baking is like a fun science experiment—you mix, measure, and watch magic happen in the oven. Let’s break it down step by step.
Preparing the Cake Batter: Key Techniques
This is where all the magic begins. Follow these steps to create a smooth, lump-free batter:
- Mix Dry Ingredients First:
- Combine flour, cocoa powder, sugar, baking powder, baking soda, and a pinch of salt in a large bowl. Use a whisk to blend everything evenly.
- Combine Wet Ingredients Separately:
- In another bowl, whisk together eggs, milk (or buttermilk), melted butter (or oil), and vanilla extract. Pro tip: If you’re adding espresso powder, dissolve it in the milk first!
- Bring It All Together:
- Slowly pour the wet ingredients into the dry mixture. Stir gently with a spatula or use a hand mixer on low speed. The key is not to overmix—stop as soon as you don’t see dry streaks.
- Add Hot Water (or Coffee):
- Gradually stir in a cup of hot water or brewed coffee. This step may seem unusual, but it enhances the chocolate flavor and ensures a moist cake. The batter will be thin—that’s normal!
Baking Tips for Evenly Cooked Layers
Getting those perfect, fluffy layers is easier than you think!
- Preheat the Oven: Set your oven to 350°F (175°C) and let it warm up fully before baking.
- Prepare Your Pans: Line your cake pans with parchment paper and lightly grease the sides. This prevents sticking and makes removing the cakes a breeze.
- Divide Batter Evenly: Pour the batter into the pans, using a measuring cup for accuracy. Even layers = even baking!
Testing for Doneness: How to Avoid Undercooking or Overbaking
No one wants a soggy middle or a dry edge. Use these tricks to bake to perfection:
- Time It Right: Most chocolate cakes take 30–35 minutes to bake.
- The Toothpick Test: Insert a toothpick into the center of the cake. If it comes out clean or with a few crumbs, your cake is done!
- Cool Before Removing: Let the cakes cool in their pans for 10 minutes, then transfer them to a wire rack to cool completely.
Crafting the Perfect Frosting
What’s a chocolate cake without a luscious frosting to match? This is where your cake goes from “yum” to “OMG!” Let’s whip up the perfect topping to complement your rich, moist cake.
Types of Frosting: Buttercream, Ganache, or Cream Cheese
Each frosting has its own charm. Choose the one that makes your taste buds happiest!
- Classic Buttercream Frosting:
- Made with butter, powdered sugar, cocoa powder, and a splash of milk or cream.
- Perfect for a fluffy, light texture and a mildly sweet chocolate flavor.
- Decadent Ganache:
- A luxurious mix of melted chocolate and heavy cream.
- Ideal if you love a glossy, rich, and slightly fudgy finish.
- Chocolate Cream Cheese Frosting:
- Combines cream cheese, cocoa powder, powdered sugar, and vanilla.
- Offers a tangy twist that balances the cake’s sweetness beautifully.
Tips for Achieving a Smooth and Silky Texture
No one wants lumpy frosting! Here’s how to nail that perfect consistency:
- Use Room-Temperature Ingredients: Cold butter or cream cheese can cause clumps.
- Sift Your Powdered Sugar: This prevents any sneaky lumps from ruining your frosting.
- Mix Slowly at First: Start on low speed to avoid a powdered sugar cloud in your kitchen, then increase the speed for a creamy finish.
Adding Flavor Enhancements to Elevate Your Frosting
Want to take your frosting to the next level? Try these add-ins:
- Espresso Powder: Just a pinch deepens the chocolate flavor.
- Vanilla Extract: Adds warmth and balance.
- Sea Salt: A sprinkle on top of the frosted cake adds a delightful contrast.
- Nutella or Peanut Butter: Mix a spoonful into your frosting for a fun twist.
Now that your frosting is ready, it’s time to turn your cake into a masterpiece. Let’s move on to decorating!
Decorating and Presentation Ideas
This is where your creativity shines. Whether you keep it simple or go all out, decorating is your chance to make your cake as stunning as it is delicious.
Simple Yet Elegant Chocolate Cake Decorations
You don’t need to be a pro to make your cake look amazing! Try these ideas:
- Smooth Frosting Layers: Use an offset spatula for a clean, polished look.
- Chocolate Shavings: Sprinkle them over the top for a touch of elegance.
- Drizzle Ganache: Let it flow over the edges for a dramatic effect.
Creative Toppings: Fruits, Nuts, and Edible Accents
Add color, texture, and flavor with these toppings:
- Fresh Berries: Raspberries, strawberries, or cherries pair perfectly with chocolate.
- Crushed Nuts: Almonds, hazelnuts, or pistachios add crunch and flavor.
- Edible Flowers: Perfect for a special occasion or just because!
Layering and Stacking for a Professional Look
Want a bakery-style cake? Follow these tips:
- Level Your Layers: Trim the tops of your cakes with a serrated knife for an even stack.
- Use a Turntable: Makes applying frosting and decorating a breeze.
- Add a Crumb Coat: Apply a thin layer of frosting first, chill it, then frost fully. This prevents crumbs from sneaking into the final layer.
Pro Tips and Troubleshooting
Even seasoned bakers have their hiccups, so don’t worry if something doesn’t go as planned. Here are some expert tips and quick fixes to make sure your chocolate cake turns out perfectly every time!
Common Baking Mistakes and How to Fix Them
- Dry Cake:
- Why It Happens: Overbaking or not enough moisture in the batter.
- Fix It: Add a simple syrup (equal parts sugar and water) to the cake layers before frosting.
- Cake Sticks to the Pan:
- Why It Happens: Forgetting to grease or line the pans.
- Fix It: Run a knife around the edges and gently tap the pan bottom. For the future, always use parchment paper!
- Lumpy Batter:
- Why It Happens: Improper mixing.
- Fix It: Strain your batter through a sieve or whisk vigorously to break up lumps.
How to Keep Your Cake Moist and Fresh
- Wrap It Up: Once cooled, wrap the cake tightly in plastic wrap if you’re not frosting it immediately.
- Store Smart: Keep frosted cakes in an airtight container or cover them with a cake dome to lock in moisture.
- Freeze for Later: Wrap individual slices or entire layers in plastic wrap, then foil. Freeze for up to 3 months. Just thaw overnight before enjoying!
Storing and Reheating for Optimal Flavor
- Refrigerator Storage: A frosted cake can last 3–4 days in the fridge. Bring it to room temperature before serving for the best flavor.
- Reheating Tips: For unfrosted slices, microwave for 10–15 seconds to revive that just-baked softness.
Now that you’re a pro at troubleshooting, why not explore some fun ways to make your chocolate cake even more exciting? Let’s dive into some delicious variations!
Variations to Try
Why stick to the classic when you can mix things up? These chocolate cake variations will wow your taste buds and keep you coming back for more.
Gluten-Free Chocolate Cake: A Healthier Twist
- How It’s Made: Substitute regular flour with almond flour or a gluten-free baking mix.
- The Result: A moist, dense cake that’s just as satisfying as the original. Perfect for gluten-sensitive friends and family!
Vegan Chocolate Cake: No Eggs, No Dairy, All Flavor
- How It’s Made: Replace eggs with unsweetened applesauce or flaxseed meal, and use plant-based milk and oil.
- The Result: A rich, tender cake with no compromise on flavor.
Adding a Twist: Infused Flavors Like Orange, Coffee, or Mint
- Orange Chocolate Cake: Add orange zest to the batter and a splash of orange juice for a citrusy kick.
- Mocha Cake: Stir in a teaspoon of instant coffee or espresso powder for a bold, coffee-infused flavor.
- Mint Chocolate Cake: Add a few drops of peppermint extract to the batter or frosting for a refreshing twist.
Each variation offers a unique spin on the classic chocolate cake, ensuring there’s something for everyone.
Your chocolate cake journey has come full circle—from gathering the ingredients to perfecting the frosting, decorating like a pro, and even experimenting with exciting flavors. With these tips and recipes, you’re ready to bake a cake that will impress, delight, and, most importantly, bring smiles to everyone’s faces.
Now, what are you waiting for? Grab your apron, preheat that oven, and let the chocolatey fun begin!





Can you be more specific about the content of your article? After reading it, I still have some doubts. Hope you can help me.
I don’t think the title of your article matches the content lol. Just kidding, mainly because I had some doubts after reading the article.
Thanks for sharing. I read many of your blog posts, cool, your blog is very good.
Your point of view caught my eye and was very interesting. Thanks. I have a question for you.
j2wyk8
Your article helped me a lot, is there any more related content? Thanks!
Thanks for sharing. I read many of your blog posts, cool, your blog is very good.
Thanks for sharing. I read many of your blog posts, cool, your blog is very good.
Can you be more specific about the content of your article? After reading it, I still have some doubts. Hope you can help me.
Thank you for your sharing. I am worried that I lack creative ideas. It is your article that makes me full of hope. Thank you. But, I have a question, can you help me?
Your point of view caught my eye and was very interesting. Thanks. I have a question for you.
Can you be more specific about the content of your article? After reading it, I still have some doubts. Hope you can help me.
Thanks for sharing. I read many of your blog posts, cool, your blog is very good. https://accounts.binance.com/en-IN/register?ref=UM6SMJM3
Thank you for your sharing. I am worried that I lack creative ideas. It is your article that makes me full of hope. Thank you. But, I have a question, can you help me? https://accounts.binance.com/de-CH/register-person?ref=UM6SMJM3
Thank you for your sharing. I am worried that I lack creative ideas. It is your article that makes me full of hope. Thank you. But, I have a question, can you help me?
Thank you for your sharing. I am worried that I lack creative ideas. It is your article that makes me full of hope. Thank you. But, I have a question, can you help me?
Thank you for your sharing. I am worried that I lack creative ideas. It is your article that makes me full of hope. Thank you. But, I have a question, can you help me?
Thank you for your sharing. I am worried that I lack creative ideas. It is your article that makes me full of hope. Thank you. But, I have a question, can you help me? https://www.binance.com/hu/register?ref=FIHEGIZ8
Thanks for sharing. I read many of your blog posts, cool, your blog is very good.
Can you be more specific about the content of your article? After reading it, I still have some doubts. Hope you can help me.
Thank you for your sharing. I am worried that I lack creative ideas. It is your article that makes me full of hope. Thank you. But, I have a question, can you help me?
Thank you for your sharing. I am worried that I lack creative ideas. It is your article that makes me full of hope. Thank you. But, I have a question, can you help me?
Can you be more specific about the content of your article? After reading it, I still have some doubts. Hope you can help me.
Your article helped me a lot, is there any more related content? Thanks!
Thank you for your sharing. I am worried that I lack creative ideas. It is your article that makes me full of hope. Thank you. But, I have a question, can you help me?
Your point of view caught my eye and was very interesting. Thanks. I have a question for you.
Thanks for sharing. I read many of your blog posts, cool, your blog is very good.
Thank you, your article surprised me, there is such an excellent point of view. Thank you for sharing, I learned a lot.
Your point of view caught my eye and was very interesting. Thanks. I have a question for you.
Your point of view caught my eye and was very interesting. Thanks. I have a question for you.
Your article helped me a lot, is there any more related content? Thanks!
Can you be more specific about the content of your article? After reading it, I still have some doubts. Hope you can help me.
Your article helped me a lot, is there any more related content? Thanks!
Can you be more specific about the content of your article? After reading it, I still have some doubts. Hope you can help me.
Can you be more specific about the content of your article? After reading it, I still have some doubts. Hope you can help me.
Thank you for your sharing. I am worried that I lack creative ideas. It is your article that makes me full of hope. Thank you. But, I have a question, can you help me?
Can you be more specific about the content of your article? After reading it, I still have some doubts. Hope you can help me.
5oi1n0
Thanks for sharing. I read many of your blog posts, cool, your blog is very good.
I don’t think the title of your article matches the content lol. Just kidding, mainly because I had some doubts after reading the article.
Your article helped me a lot, is there any more related content? Thanks!
Your point of view caught my eye and was very interesting. Thanks. I have a question for you.
Can you be more specific about the content of your article? After reading it, I still have some doubts. Hope you can help me.
I don’t think the title of your article matches the content lol. Just kidding, mainly because I had some doubts after reading the article. https://www.binance.com/en-NG/register?ref=JHQQKNKN
Your point of view caught my eye and was very interesting. Thanks. I have a question for you. https://www.binance.info/en-ZA/register?ref=JHQQKNKN
Your article helped me a lot, is there any more related content? Thanks! https://www.binance.info/id/register-person?ref=GJY4VW8W
Your point of view caught my eye and was very interesting. Thanks. I have a question for you.
Thanks for sharing. I read many of your blog posts, cool, your blog is very good.
Your point of view caught my eye and was very interesting. Thanks. I have a question for you.
Thanks for sharing. I read many of your blog posts, cool, your blog is very good. https://www.binance.com/en-NG/register?ref=JHQQKNKN
Thank you for your sharing. I am worried that I lack creative ideas. It is your article that makes me full of hope. Thank you. But, I have a question, can you help me?
I don’t think the title of your article matches the content lol. Just kidding, mainly because I had some doubts after reading the article.
Thank you for your sharing. I am worried that I lack creative ideas. It is your article that makes me full of hope. Thank you. But, I have a question, can you help me? binance Registrera
I don’t think the title of your article matches the content lol. Just kidding, mainly because I had some doubts after reading the article.
Your point of view caught my eye and was very interesting. Thanks. I have a question for you. open a binance account
Your article helped me a lot, is there any more related content? Thanks! result nym
Your point of view caught my eye and was very interesting. Thanks. I have a question for you.
Can you be more specific about the content of your article? After reading it, I still have some doubts. Hope you can help me.
Can you be more specific about the content of your article? After reading it, I still have some doubts. Hope you can help me.
4uw3n1
Way cool, some valid points! I appreciate you making this article available, the rest of the site is also high quality. Have a fun.
I don’t think the title of your article matches the content lol. Just kidding, mainly because I had some doubts after reading the article.
Your article helped me a lot, is there any more related content? Thanks!
Thank you for your sharing. I am worried that I lack creative ideas. It is your article that makes me full of hope. Thank you. But, I have a question, can you help me?
I don’t think the title of your article matches the content lol. Just kidding, mainly because I had some doubts after reading the article.
Can you be more specific about the content of your article? After reading it, I still have some doubts. Hope you can help me.
I don’t think the title of your article matches the content lol. Just kidding, mainly because I had some doubts after reading the article.
I don’t think the title of your article matches the content lol. Just kidding, mainly because I had some doubts after reading the article.
I don’t think the title of your article matches the content lol. Just kidding, mainly because I had some doubts after reading the article.
Thanks for sharing. I read many of your blog posts, cool, your blog is very good.
Thanks for sharing. I read many of your blog posts, cool, your blog is very good.
I don’t think the title of your article matches the content lol. Just kidding, mainly because I had some doubts after reading the article.
Thank you for your sharing. I am worried that I lack creative ideas. It is your article that makes me full of hope. Thank you. But, I have a question, can you help me?
Thanks for sharing. I read many of your blog posts, cool, your blog is very good. https://www.binance.info/si-LK/register-person?ref=V2H9AFPY
**mindvault**
mindvault is a premium cognitive support formula created for adults 45+. It’s thoughtfully designed to help maintain clear thinking
Your article helped me a lot, is there any more related content? Thanks!